You can recycle inked paper by first gathering clean, grease-free sheets and removing stickers, staples, and other contaminants.
Next, shred the paper and soak it in water until soft.
Blend the soaked paper into a smooth pulp, then use chemical or physical methods to lift and remove the ink.
After spreading the pulp evenly, press and dry it into new sheets.
You can even add colors or textures to customize your paper.
Keep exploring to reveal all the details for this process.
Gather and Sort Inked Paper for Recycling
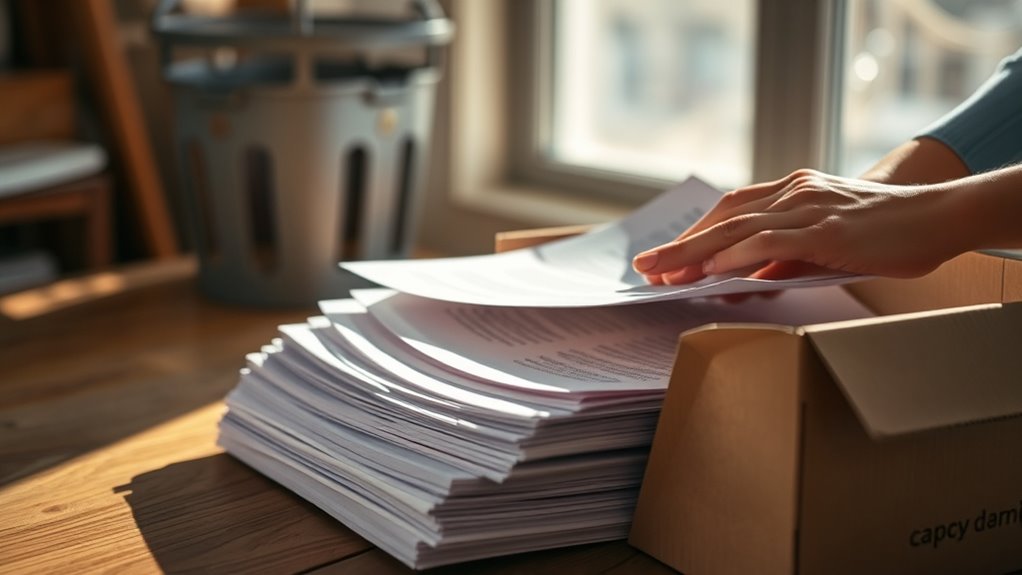
Before you begin recycling paper with ink, gather all your inked paper items like newspapers, magazines, and printed documents, making certain they’re free from food stains or grease. This step is vital because contamination can disrupt the recycling process.
Next, separate the inked paper from other materials such as plastics or glass to avoid cross-contamination during sorting. Confirm your inked paper is dry and clean since moisture or dirt can interfere with the de-inking stage, where ink is removed to create high-quality recycled paper.
Remove any staples or plastic coatings because they cause processing issues. Once everything is ready, place your sorted inked paper in designated recycling bins to streamline collection and transportation.
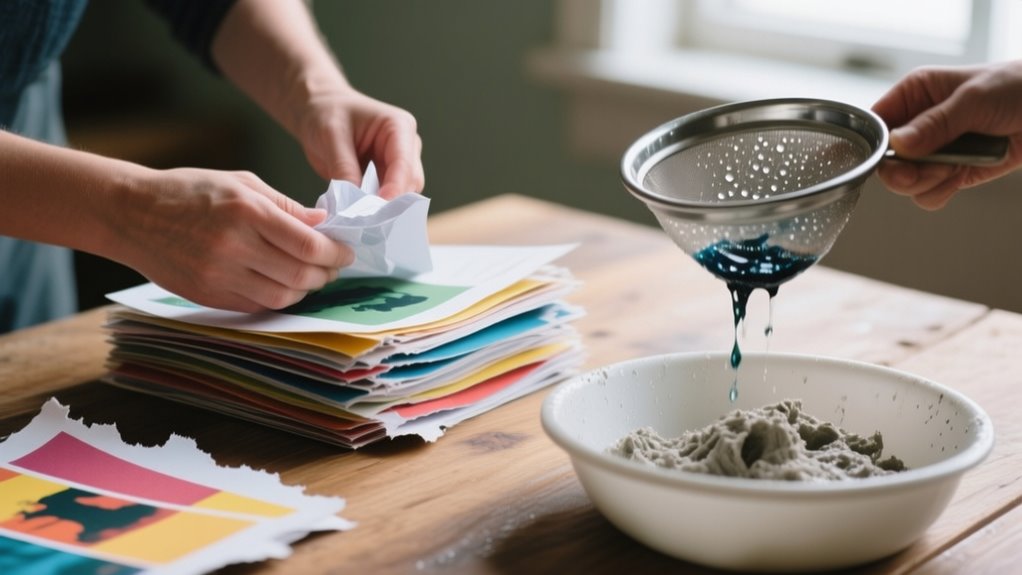
Remove Stickers, Food Waste, and Non-Paper Contaminants
Since stickers and food waste can seriously disrupt recycling, you need to remove them carefully from your paper. Start by peeling off any stickers, as their adhesive residues act as contaminants that hinder recycling quality.
Next, scrape off all food waste and grease, because organic materials spoil the recycling batch and can damage equipment. Be sure to check for other non-paper contaminants like plastic, metal, or staples, and separate these items before recycling.
Proper sorting of these contaminants prevents harm to sorting machinery and improves the overall quality of recycled paper. Moreover, flatten and dry your paper to avoid mold growth and make handling easier during processing.
Shred Paper to Prepare for Pulping
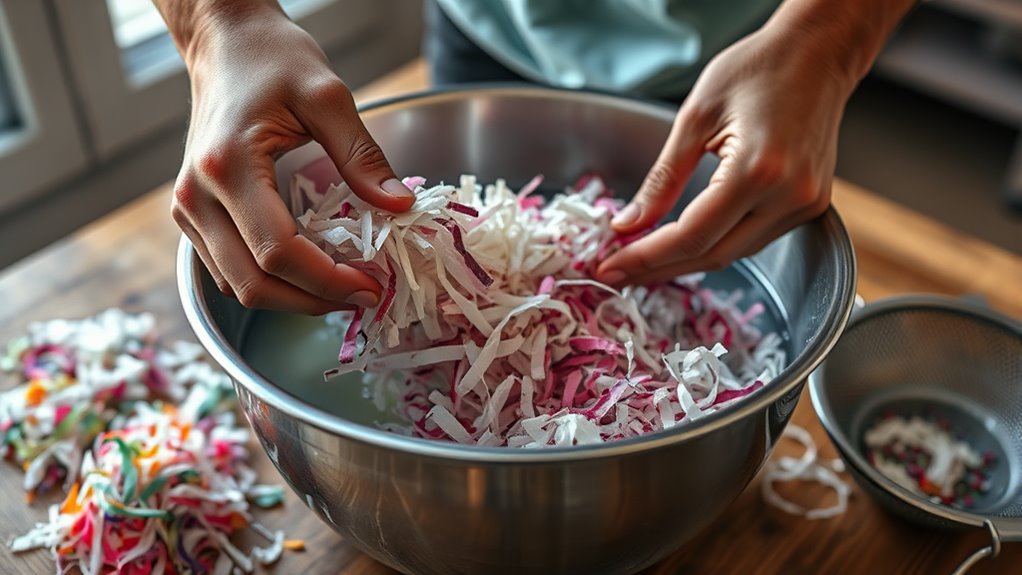
After removing stickers, food waste, and other contaminants, the next step is to shred your paper into small pieces. Shredding paper helps break down the fibers, making it easier to turn into pulp later. You can shred computer paper or any used paper, but avoid thick or large sheets to protect your tools.
Once shredded, soak the paper in water overnight. Soaking softens the fibers and prepares them for pulping, improving the overall recycling process. When the paper is fully soaked, it becomes easier to blend or mash into a smooth pulp.
Proper shredding and soaking are vital because they allow the paper fibers to separate and mix with water effectively. This preparation ensures that when you move on to pulping, the texture will be consistent and ready for the next recycling steps. By shredding and soaking correctly, you set a solid foundation for efficient paper recycling with ink.
Mix Shredded Paper With Water to Create Pulp
When you’re ready to create pulp, blend the soaked shredded paper with water until the mixture becomes smooth and consistent. Start by shredding used paper into small pieces, which helps the fibers break down more easily.
Blend soaked shredded paper with water until smooth to create pulp, starting with small shredded pieces for easier fiber breakdown.
After shredding, soak the shredded paper in water overnight. This soaking softens the fibers, making the pulping process much more effective.
When blending, maintain a water-to-paper ratio of about 99:1 to get the right consistency for paper pulp. Use a blender or mix manually, making sure you break down all the paper fragments thoroughly.
Keep blending until the mixture looks like a homogeneous pulp, free from clumps or large pieces. This smooth paper pulp is essential because it forms the base for creating new sheets of recycled paper.
Remove Ink From Pulp Using De-Inking Methods
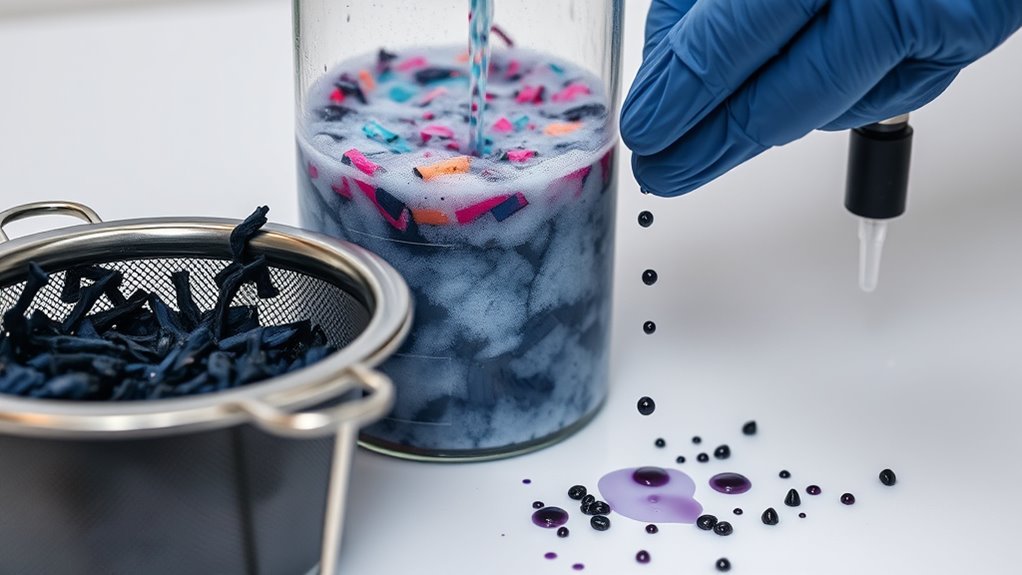
You’ll start by removing ink from the pulp using chemicals and air bubbles that lift the ink particles to the surface. After that, you can wash and bleach the pulp to brighten it up and get it ready for coloring. These steps help make sure your recycled paper looks clean and fresh when it’s reused.
Chemical Ink Removal
How does chemical ink removal work to reclaim clean paper fibers? Chemical de-inking uses surfactants and bleaching agents to dissolve and lift ink particles from the pulp.
During flotation, air bubbles attach to these ink particles, carrying them to the surface for easy skimming and effective ink removal. Chemicals like hydrogen peroxide brighten the pulp after ink lifts, restoring its whiteness.
You’ll need to maintain proper chemical concentrations and pH levels to protect the fibers while maximizing ink removal. After flotation, the pulp undergoes washing and filtering to remove leftover chemicals and ink residues.
This careful process guarantees you reclaim clean, bright fibers ready for recycling, making chemical ink removal an essential step in transforming used paper back into quality pulp.
Air Bubble Technique
Although chemical treatments play a crucial role, the air bubble technique stands out by physically lifting ink particles from pulp using fine bubbles. This method introduces tiny air bubbles into the pulp, which attach to inked fibers.
These bubbles create a frothy layer on the surface, enabling effective flotation and ink removal. You’ll see the ink particles float up, making it easier to skim them off. This approach enhances the de-inking process, resulting in cleaner, brighter recycled paper.
You’ll appreciate how this technique:
- Uses air bubbles to gently lift ink without harsh chemicals
- Creates a visible froth signaling ink separation
- Employs flotation to remove ink particles efficiently
- Improves the overall quality of recycled pulp
Bleaching And Coloring
Why is bleaching an important step after removing ink from recycled pulp? After the de-inking process, the pulp often looks gray, especially if the original paper had heavy ink. Bleaching brightens this pulp, making it clean and ready for reuse.
You can use bleaching chemicals like hydrogen peroxide or chlorine dioxide to achieve this. These chemicals help remove any residual ink and improve the pulp’s whiteness. Without bleaching, your recycled paper might look dull or uneven in color.
Once bleaching is done, you can add coloring if you want a specific shade for your new paper products. This step guarantees the recycled paper is not only free of ink but also visually appealing and suitable for manufacturing.
Bleaching and coloring complete the transformation after effective ink removal.
Get Rid of Staples, Plastics, and Other Debris
Before recycling, you’ll want to look out for staples, plastics, and other bits that might harm the equipment or mess up the pulp. It’s important to remove these carefully.
Make sure to use safe methods so you don’t tear the sheets while pulling out non-paper materials. Getting rid of these contaminants is key to making clean, high-quality recycled paper.
Identifying Non-Paper Contaminants
When you start recycling paper, you need to carefully identify and remove non-paper contaminants like staples, plastic clips, and adhesives. This protects your machinery and guarantees a clean final product. Non-paper debris can clog equipment and reduce the quality of recycled paper.
While small staples might be separated later, large or plastic staples must be taken out manually. Contaminants like tape, glue, or food residues can also harm the pulping process.
Keep an eye out for:
- Hidden staples embedded in paper stacks
- Plastic clips that resist shredding
- Sticky adhesives that trap fibers
- Food or dirt residues contaminating sheets
Removing these contaminants ensures smoother recycling and higher-quality paper every time.
Safe Removal Techniques
After spotting non-paper contaminants like staples, plastic clips, and adhesives, you’ll need to remove them carefully to protect your recycling equipment and guarantee clean paper fibers. Start by pulling out staples and metal clips to prevent damage and avoid contamination.
Next, peel off plastic coatings or laminations, since plastics cause stains and interfere with ink removal during recycling. Use a brush or rinse off any food residue or grease to avoid contamination that hinders cleaning and processing.
Remove adhesive labels, tape, rubber bands, and other foreign objects, as they require separate disposal or recycling. By thoroughly eliminating these debris, you confirm your recycled paper stays clean and free from stains, improving the quality of ink removal and overall recycling efficiency.
Importance of Debris Filtering
Why is filtering out staples, plastics, and other debris so crucial in paper recycling? Debris filtering plays a critical role in protecting machinery and improving product quality. Removing these contaminants guarantees a smooth recycling process and a more effective de-inking phase.
If you skip this step, you risk damaged equipment and lower-quality pulp.
Here’s why you must prioritize debris filtering:
- Prevent costly machinery damage and downtime
- Avoid contamination that ruins pulp quality
- Enhance ink removal during de-inking
- Minimize safety hazards for workers
Filtering out non-paper debris keeps the recycling process efficient and safe, ensuring your recycled paper turns out clean and strong every time. Don’t overlook this essential step to make your recycling efforts truly effective.
Spread and Dry Pulp Into Recycled Paper Sheets
Once you spread the pulp onto a mold or screen, gently press it to remove excess water and guarantee an even layer. This step is vital for ensuring the recycled paper sheets dry uniformly and don’t develop weak spots.
After pressing, carefully transfer the pulp to a drying surface, often by sandwiching it between layers of felt, to help it dry flat. The drying process usually takes about a day, during which the moisture evaporates and the sheets gain strength.
Make sure the pulp is fully dried before moving on. Damp sheets risk mold growth and warping during storage. Once dried, you can peel your recycled paper sheets off the surface, revealing smooth, sturdy sheets ready for further use.
Properly spreading and drying the pulp sets a strong foundation for quality recycled paper, making your effort worthwhile and sustainable.
Press and Flatten Sheets for a Smooth Finish
With your recycled paper sheets fully dried, the next step is to press and flatten them to achieve a smooth, professional finish. Pressing your sheets helps remove any leftover water and smooths out wrinkles, giving your paper a flat, polished look.
To do this effectively, place a clean, absorbent cloth or felt layer between the sheets and your pressing tool to prevent sticking or tearing. Focus on applying gentle, even pressure to flatten the sheets without creating air bubbles or uneven spots.
Once pressed, let your sheets sit under weight for several hours or overnight to maximize flatness and durability. This step makes your recycled paper easier to handle and ready for any craft or printing project.
Remember, when you press and flatten your sheets, you’ll:
- Eliminate wrinkles and rough textures
- Improve paper strength and durability
- Remove excess water for a crisp finish
- Create smooth, flat surfaces that feel professional
Customize Your Recycled Paper With Colors and Textures
You can make your recycled paper truly stand out by adding vibrant colors during the pulping process. Just try mixing in some food coloring or scraps of colored paper to create unique hues. It’s a fun way to get creative!
And if you want to add some texture, you can toss in materials like patterned fabric or small fibers. This gives your paper a distinctive feel that really sets it apart. Give it a go and see what cool results you come up with!
Adding Vibrant Colors
Although recycling paper provides a great base, adding vibrant colors brings your creation to life and lets you customize the look. You can mix food-safe dyes like Kool-Aid or commercial dyes into the pulp before forming sheets, giving your recycled paper bold hues.
Incorporating colored paper scraps during pulping enhances brightness and variety, making each sheet unique. Choosing between liquid watercolor or dye powders affects color permanence and intensity.
Remember, the water-to-pulp ratio and dye amount control how vivid your colors appear.
Try these tips to make your recycled paper pop:
- Mix inks and dyes thoroughly for even color distribution
- Add scraps of colored paper for bursts of brightness
- Experiment with dye powders for long-lasting vibrancy
- Adjust pulp consistency to control color depth
This way, your recycled paper will truly stand out!
Incorporating Unique Textures
When you add textured materials like patterned tights, ripped clothing, or natural elements such as rose petals to your pulp, you create unique surface designs that make each sheet truly one-of-a-kind. You can also embed decorative materials during pulp formation to enhance both the look and feel of your handmade paper.
For a consistent texture, try embossing sheets or using old bookbinding presses, which add stylized patterns. Adjusting the pulp’s thickness or mixing in glue or starch boosts durability and texture.
Don’t hesitate to experiment with colored scraps or dyes alongside these textured materials for personalized, vibrant results. By combining these techniques, you’ll transform your recycled paper into a tactile, visually striking creation that stands out with its unique textures and colors.
Store and Use Your Handmade Recycled Paper
After your handmade recycled paper dries completely, carefully peel it from the drying surface to avoid tearing. To keep your paper flat and smooth, press it in a heavy book or between layers of paper for several hours.
Proper storage is essential to protect your recycled paper’s quality. Place your handmade paper in a dry, flat spot, ideally inside a folder or protective cover to prevent creases and damage. Avoid moisture, direct sunlight, and extreme temperatures, which can weaken the fibers and discolor your paper.
When you store your recycled paper well, you can enjoy:
- The satisfaction of preserving your eco-friendly creation
- Using it for unique crafting projects and personalized cards
- Impressing friends with its distinctive texture
- Knowing you’ve contributed to reducing waste
With careful storage, your handmade paper will stay beautiful and ready for use whenever inspiration strikes.
Frequently Asked Questions
Can All Types of Ink Be Removed During Recycling?
Not all types of ink can be fully removed during recycling because ink removal challenges vary with ink type variations. Water-based inks come off easier, but UV and metallic inks often resist standard processes.
You’ll face recycling process limitations, especially with coated papers that leave streaks. Keep environmental impact considerations in mind; some chemical treatments needed for tough inks can affect sustainability.
Is Recycled Paper as Strong as New Paper?
You know what they say: “You can’t make a silk purse out of a sow’s ear.” Recycled paper’s quality isn’t always as strong as new paper because fibers shorten with each recycling cycle.
However, advanced recycling methods and effective ink removal help maintain decent strength. While it might be slightly weaker, recycled paper still offers huge eco benefits by reducing waste and conserving resources, making it a smart, sustainable choice.
How Long Does the Recycling Process Take From Start to Finish?
The recycling process usually takes about 1 to 2 weeks from start to finish. Paper contamination can slow the timeline since it complicates ink removal techniques, requiring extra steps. Your recycling facility’s processing efficiency also matters. A more efficient setup speeds things up.
Shredding, pulping, and de-inking take a few days, while drying and pressing add another day or two. Transportation between sites adds more time, so the whole process varies based on these factors.
Are There Environmental Benefits to Recycling Inked Paper?
Think of recycling inked paper like planting a tree that cleans the air around you. Yes, there are huge environmental benefits! You’re cutting down pollution, conserving resources like water and trees, and reducing the environmental impact of paper production.
This process lowers harmful chemical release and greenhouse gases, boosting ecological benefits. By recycling inked paper, you actively protect the planet and help create a cleaner, greener future for everyone.
Can I Recycle Glossy or Coated Paper With Ink?
You can recycle glossy paper and coated paper with ink, but it’s tricky. Recycling challenges arise because the coating traps ink, making ink removal harder. Many facilities won’t accept these papers unless they have specialized processes for de-inking.
If your local program does take them, they often use extra chemical treatments to remove ink effectively. So, check with your recycler before tossing glossy or coated paper into the bin.
Conclusion
Now that you’ve learned how to recycle paper with ink step by step, you’re ready to turn trash into treasure. By following these simple steps, you’re not just saving materials, but also giving new life to old paper.
Remember, every little bit helps. Don’t throw the baby out with the bathwater. Keep experimenting with colors and textures, and enjoy the satisfaction of creating your own recycled paper right at home!
Leave a Reply