You’ll start by gathering 00 flour, eggs, and squid ink, then mix them into a dough on a clean surface.
Knead the dough until smooth and elastic, then let it rest wrapped in cling film to relax.
Roll it out thin using a pasta machine or pin, and cut into your preferred shape.
Cook fresh pasta in salted water for just minutes until al dente.
Serve immediately with seafood or herbs for best flavor.
Following these steps gets you close; there’s more to perfecting the process.
Gather Essential Utensils and Ingredients for Squid Ink Pasta
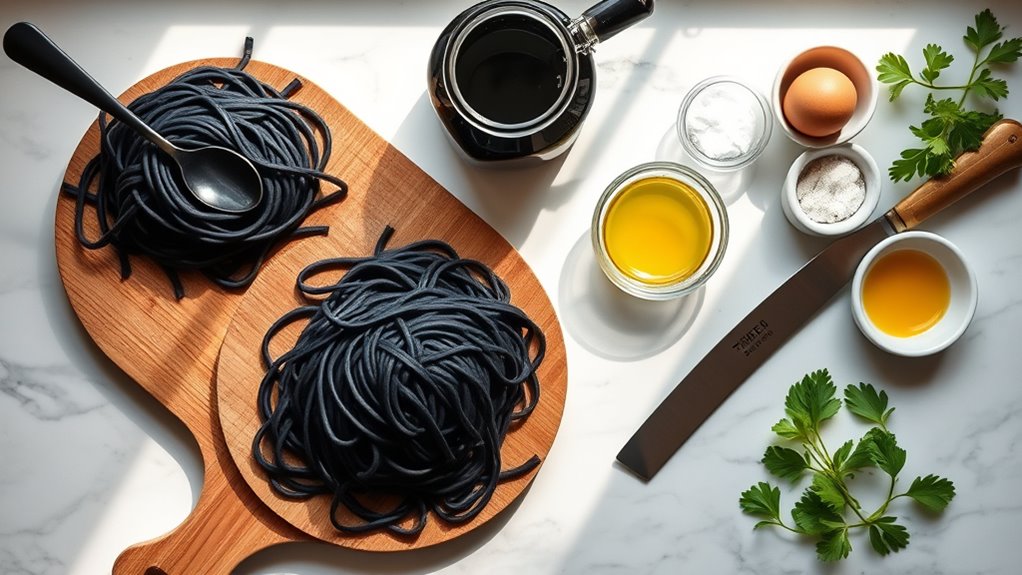
Before you begin making squid ink pasta, gather all the essential utensils and ingredients to guarantee a smooth process. You’ll need 200g of 00 flour, 2 large eggs, and a little bit of squid ink, about 1.5 teaspoons. Set up a clean work surface where you can comfortably prepare your dough.
A fork will help you beat the eggs and mix in the squid ink evenly before you start kneading. For rolling out the pasta, have a pasta machine or rolling pin ready. Don’t forget cling film to wrap the dough during resting, which helps keep it from drying out.
When you roll the dough, cover it with a damp tea towel to maintain moisture. Having these utensils and ingredients organized ahead of time ensures you won’t have to stop midway, making the entire process smoother and more enjoyable. With everything on hand, you’re ready for the next step.
Prepare Squid Ink Pasta Dough From Scratch
With your utensils and ingredients ready, start by creating a well with the 200g of 00 flour on a clean surface. Crack in two large eggs and beat them smoothly with a fork before adding 1.5 teaspoons of squid ink. This coloring technique gives your dough a striking black hue that enhances visual appeal and subtly infuses oceanic flavor, perfect for seafood-based dishes. Gradually incorporate the flour into the egg and ink mixture, forming a cohesive dough.
While preparing your squid ink pasta dough from scratch, consider flavor pairing to complement your sauce choice. The dough’s briny, umami notes work best with light, creamy sauces or tomato-based ones, ensuring sauce compatibility without overpowering the pasta’s unique taste.
Once combined, avoid kneading here since that’s next. Instead, focus on mixing ingredients evenly to set a strong foundation for texture and flavor, making your squid ink pasta stand out both in color and taste.
Knead Squid Ink Pasta Dough for Perfect Texture
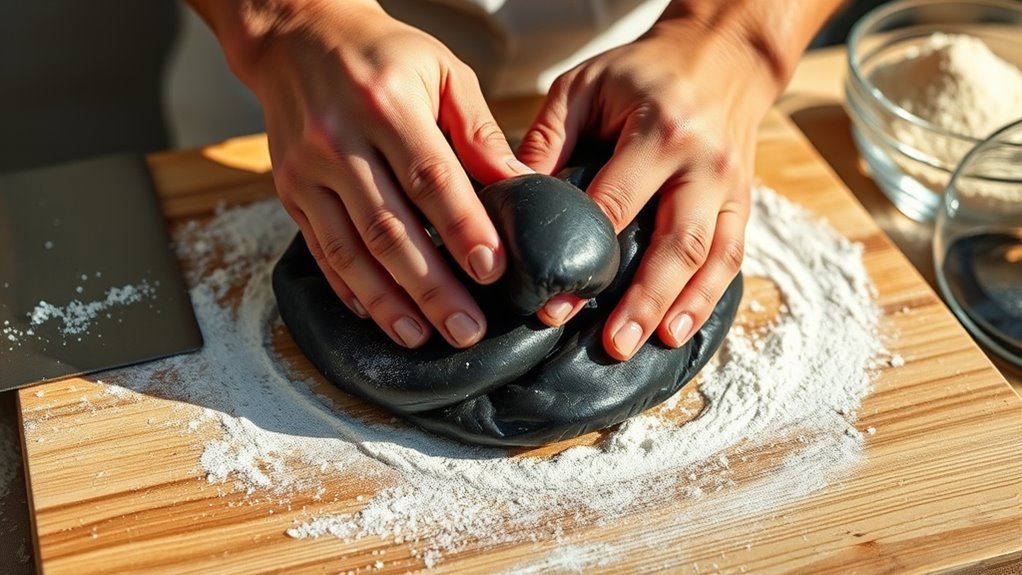
You’ll want to knead your squid ink pasta dough for about five minutes to develop the gluten properly. This is what gives it that smooth, elastic texture we’re aiming for. Make sure to press and fold the dough evenly as you go along.
Try to get the dough to feel slightly tacky but not sticky—that’s the sweet spot. Once you notice these texture signs, you’ll know your dough is ready to rest and then roll out. Easy, right?
Kneading Techniques Explained
Although kneading squid ink pasta dough might seem simple, mastering the technique is key to achieving the perfect texture. Proper kneading helps develop gluten and enhances dough elasticity, making your pasta smooth and resilient. Focus on these essential steps:
Use the heel of your hand to press the dough away, then fold it back over to build a consistent gluten network. Knead for about five minutes until the dough feels smooth, slightly tacky, and elastic but not sticky. Test the dough by pressing your finger gently; it should spring back quickly, signaling good gluten development.
Avoid over-kneading to prevent toughness. Stop once the dough is cohesive and elastic, ensuring your squid ink pasta will have the ideal bite and texture.
Gluten Development Importance
When you knead squid ink pasta dough properly, you develop gluten that gives your pasta its essential elasticity and chewiness. Gluten formation is crucial because it creates a strong network within the dough, enhancing elasticity and improving dough stability.
Kneading for about five minutes helps the dough become smooth and cohesive, ensuring this network traps air and moisture effectively. This prevents your pasta from becoming brittle or sticky during cooking.
If you under-knead, the gluten won’t develop enough, leaving the dough fragile and prone to tearing when rolled or shaped. By focusing on consistent gluten formation, you’ll achieve a springy, resilient pasta dough that holds its shape and offers the perfect bite every time.
Prioritize proper kneading to unlock the full potential of your squid ink pasta.
Dough Texture Indicators
As you knead squid ink pasta dough, pay close attention to its texture to know when it’s just right. Achieving perfect dough elasticity signals proper gluten formation, which is essential for that ideal bite. You want a good moisture balance, not too dry or sticky, for smooth handling.
Look for these dough texture indicators:
- The dough feels smooth and elastic, bouncing back gently when pressed, showing strong gluten formation.
- It’s slightly tacky but never sticky, indicating the right moisture balance.
- The dough rolls out easily without cracking or tearing, proving it’s pliable and well-kneaded.
If your dough feels crumbly or overly dry, add a bit of water or eggs. Mastering these signs guarantees your squid ink pasta dough will have the perfect texture every time.
Let the Dough Rest to Improve Texture and Flavor

Since letting the dough rest in the refrigerator for at least 30 minutes relaxes the gluten, you’ll find it much easier to roll out and shape. This resting period is essential to dough fermentation, where flavor development occurs as the ingredients meld together, enriching your squid ink pasta’s taste.
During this time, moisture redistribution happens within the dough, improving its cohesiveness and preventing cracks while rolling. To keep the dough from drying out and forming a skin, wrap it tightly in cling film before refrigerating.
This simple step enhances the dough’s texture, making it smoother and more elastic, which makes handling and shaping a breeze. By giving the dough this vital resting time, you set the stage for a pasta that’s not only flavorful but also has a perfect consistency. Don’t skip this step; your squid ink pasta will thank you for it.
Roll Out Squid Ink Pasta Dough Thinly and Evenly
Start by dividing your rested dough into smaller portions, and make sure to keep the unused pieces covered so they don’t dry out. Then, use a pasta machine or a rolling pin to roll the dough out evenly.
You’ll want to aim for about 2mm thickness. Keep an eye on the surface as you roll to make sure the sheet stays uniform without any thin spots.
Prevent Dough From Drying
When you roll out squid ink pasta dough, keeping it moist is essential to prevent cracking and guarantee a smooth texture. Effective dough drying prevention starts with moisture retention techniques and covering methods that shield the dough from air exposure.
To maintain moisture while rolling out your dough, try these tips: cover the dough with a damp tea towel during pauses to lock in moisture. Lightly flour the surface and rolling pin, which helps reduce sticking without drying the dough. Work quickly and shape the pasta immediately after rolling to minimize air exposure.
Achieve Uniform Thickness
Although rolling out squid ink pasta dough thinly can be challenging, using a pasta machine set to the widest setting first helps you achieve an even thickness. Start by rolling the dough through the machine, gradually decreasing the thickness setting until it’s translucent.
Rotate the dough 90 degrees between each pass to promote thickness consistency and prevent curling. Use light, consistent pressure. Pressing too hard can compromise dough elasticity and cause uneven thickness.
Lightly flour the dough before each pass to avoid sticking and tearing, which disrupts smooth rolling. Periodically check the dough by holding it up to the light or comparing it to a coin to ensure uniform thinness.
These rolling techniques guarantee your squid ink pasta dough stays thin and even, ready for perfect cooking.
Choose Your Pasta Shape and Shape the Dough
Before shaping your squid ink pasta dough, decide on the pasta shape that best suits your dish, whether it’s wide pappardelle ribbons, delicate tagliatelle, or stuffed ravioli. This choice affects not only the cooking time but also the presentation and pairing with sauces.
Divide the rested dough into small portions to roll out evenly, preventing uneven thickness. Use a pasta machine or rolling pin to achieve the perfect thinness for your selected shape. Cut or fill the dough accordingly, working quickly to keep it from drying out.
Divide dough into portions and roll thinly with a machine or pin, working swiftly to prevent drying.
Keep these tips in mind:
- Follow traditional pasta recipes to respect authentic textures and flavors.
- Use proper pasta storage techniques if you plan to save some dough or finished pasta for later.
- Apply pasta presentation tips to elevate the visual appeal of your dish, especially with striking squid ink pasta.
Choosing and shaping your pasta thoughtfully guarantees a delicious, professional-looking meal.
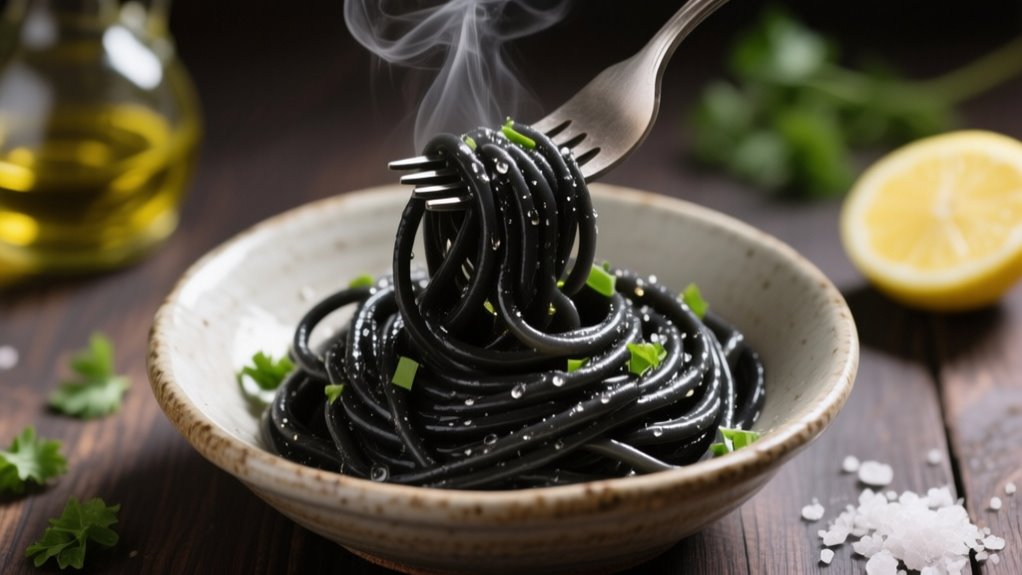
Cook and Serve Fresh Squid Ink Pasta Perfectly
After shaping your squid ink pasta, cooking it properly brings out its unique flavor and texture. Start by boiling a large pot of salted water, about 1-2 tablespoons of salt per liter. Add the fresh pasta and cook for 2-3 minutes until it floats and becomes al dente. Drain it quickly, reserving a small cup of pasta water to adjust your sauce’s consistency if needed.
Immediately toss the pasta with your sauce or olive oil to prevent sticking and enhance flavor. Classic flavor pairings include seafood, garlic, and fresh herbs, which complement the pasta’s briny taste beautifully. Serve it hot with a garnish of fresh herbs or seafood for an authentic touch.
For pasta storage, keep any leftovers in an airtight container in the fridge and consume within 1-2 days. A key cooking tip is to avoid overcooking, as fresh squid ink pasta cooks much faster than dried varieties. Enjoy your perfectly cooked dish!
Frequently Asked Questions
Can I Substitute Squid Ink With Another Ingredient?
Yes, you can substitute squid ink with color alternatives like activated charcoal powder or black food coloring for a similar dark hue.
If you want dietary substitutions, black sesame or black bean paste works but changes the flavor. Beetroot juice offers a vibrant twist but shifts the taste completely.
Keep in mind these substitutes bring flavor variations and won’t replicate the traditional seafood taste, so pick based on what matters most to you.
How Long Can Squid Ink Pasta Be Stored in the Fridge?
You can keep your squid ink pasta cozy in the fridge for up to 2 days without worry. To avoid a less-than-ideal texture, don’t let it dry out. Cover it lightly or leave it uncovered if your fridge’s humidity is just right.
If you’re thinking about ingredient substitution, remember that storage tips might differ. Always check for freshness before enjoying, ensuring your pasta stays as delightful as when you first made it.
What Dishes Pair Best With Squid Ink Pasta?
You’ll find that seafood dishes like shrimp, calamari, or clams offer excellent flavor enhancement when paired with squid ink pasta.
If you want ingredient alternatives, try rich cream sauces with lobster or scallops for a luscious twist. Cooking techniques such as lightly sautéing seafood or using citrus-infused olive oil help highlight the pasta’s unique taste.
Don’t forget to garnish with parsley or lemon to brighten the dish beautifully.
Is Squid Ink Pasta Safe for People With Seafood Allergies?
If your seafood allergy concerns feel like steering through a stormy sea, you’re right to be cautious with squid ink pasta. While squid ink itself isn’t a typical allergen, cross-contamination can lurk beneath the surface.
You should look for allergy-friendly options labeled free from shellfish traces or consider ingredient substitutions like black garlic pasta. Always consult your allergist before diving in to keep your meals safe and worry-free.
Can I Freeze Squid Ink Pasta Dough Before Cooking?
Yes, you can freeze squid ink pasta dough before cooking. When using this cooking technique, wrap the dough tightly to avoid freezer burn and maintain flavor variations.
Thaw it overnight in the fridge, then knead gently to restore elasticity. If you want, try ingredient substitutions like adding herbs or spices after thawing to boost flavor.
Freezing helps you prep ahead while preserving the unique taste of squid ink pasta.
Conclusion
Now that you’ve mastered these seven simple steps, you’re just moments away from tasting something truly extraordinary. Imagine the rich, briny flavor of homemade squid ink pasta melting on your tongue, crafted entirely by you.
But don’t rush. The magic happens when patience meets passion.
So, get ready to impress your friends or treat yourself to a dish that’s as stunning as it is delicious. Ready to dig in? Your culinary adventure starts now!
Leave a Reply