To refill your HP ink cartridge in 7 easy steps, first gather ink, syringes, and cleaning supplies, then prepare a clean workspace.
Turn off and unplug your printer, remove the cartridge carefully, and locate the refill hole by peeling back labels.
Fill a syringe with ink and inject it slowly to avoid bubbles.
Seal the hole, clean any spills, reinstall the cartridge, and power on your printer.
Follow these steps to save money, and you’ll also find tips to keep your prints flawless.
Gather Tools and Prepare Workspace
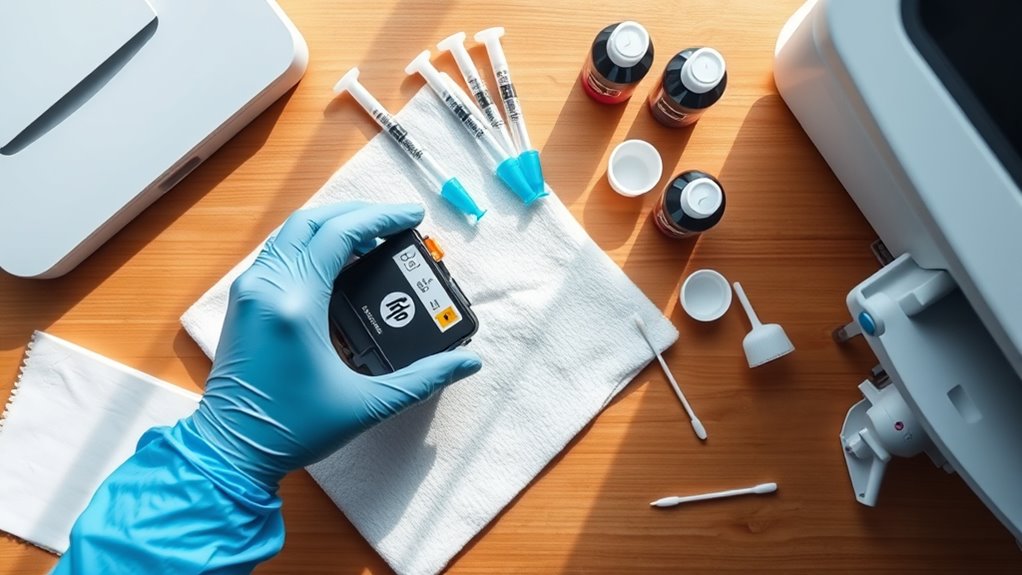
Where should you begin when refilling your HP ink cartridge? First, gather all the necessary tools and materials to prepare for a smooth refilling process. Make certain you have compatible ink, syringes, seal tape or plugs, and a refill kit ready.
Next, set up a clean, well-lit workspace covered with newspapers or paper towels to catch any ink spills. You’ll want this area to be free from dust and static to avoid contaminating your cartridge.
For safety, wear gloves and safety glasses to protect your skin and eyes from ink stains and splashes. Keep your tools and materials organized and within easy reach so you won’t have to pause looking for something mid-refill.
Turn Off Printer and Remove Cartridge
First, go ahead and turn off your printer, then unplug it to make sure everything is safe while you’re taking out the cartridge. Next, open up the printer cover so you can get to the ink cartridge easily. After that, press the release latch and carefully pull the cartridge out—just be sure not to touch the nozzles or contacts.
Power Down Printer
Why should you power down your printer before removing the ink cartridge? Powering down and unplugging your printer guarantees safety and prevents damage during cartridge removal.
Start by turning off the printer and unplugging it from the power source. Next, open the printer cover or access panel to access the cartridge slot.
The ink cartridge will be positioned in the carriage and needs to be carefully ejected. Press the release latch or gently lift the cartridge out to avoid harming internal components.
Wait at least 10 minutes after powering down before handling the cartridge, allowing residual ink to settle. This process protects you and your printer while preparing for a smooth cartridge replacement or refill.
Safe Cartridge Removal
How do you safely remove an ink cartridge from your printer? First, ensure your safety by turning off the printer and unplugging it from the power source.
Next, open the printer cover carefully to access the ink cartridge. Locate the cartridge latch and gently press or release it to unlock the cartridge. Avoid touching the electrical contacts and nozzles during cartridge removal, as this can cause damage.
Carefully lift the ink cartridge straight out of its slot. To prevent ink spills and protect the cartridge, place it on a clean surface or a paper towel. Following these steps ensures a smooth cartridge removal process while maintaining safety and preventing mess or damage to your printer components.
Find the Refill Hole on Your Cartridge
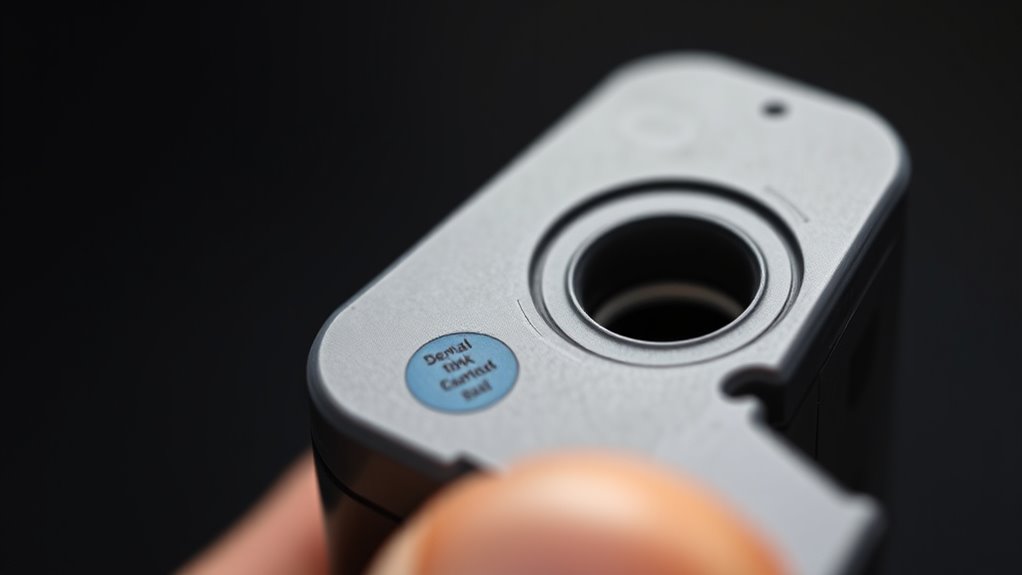
Where exactly is the refill hole on your HP ink cartridge? Typically, the refill hole is located on the top or side of the HP cartridge, sometimes hidden beneath a sticker or label. To identify its exact location, gently peel back any cover or label protecting the cartridge surface.
Many HP cartridges come with a pre-drilled or factory-made puncture designed specifically for the refilling process. This small hole or vent lets you inject ink without damaging the cartridge.
Some cartridges even have multiple refill holes for different color chambers, all drilled during manufacturing. If you don’t spot a visible hole, carefully use a sharp tool or needle to create or uncover it, but be cautious not to damage the internal parts.
Taking time to locate and properly expose the refill hole guarantees a smooth and mess-free refilling process, keeping your cartridge functional and ready to print.
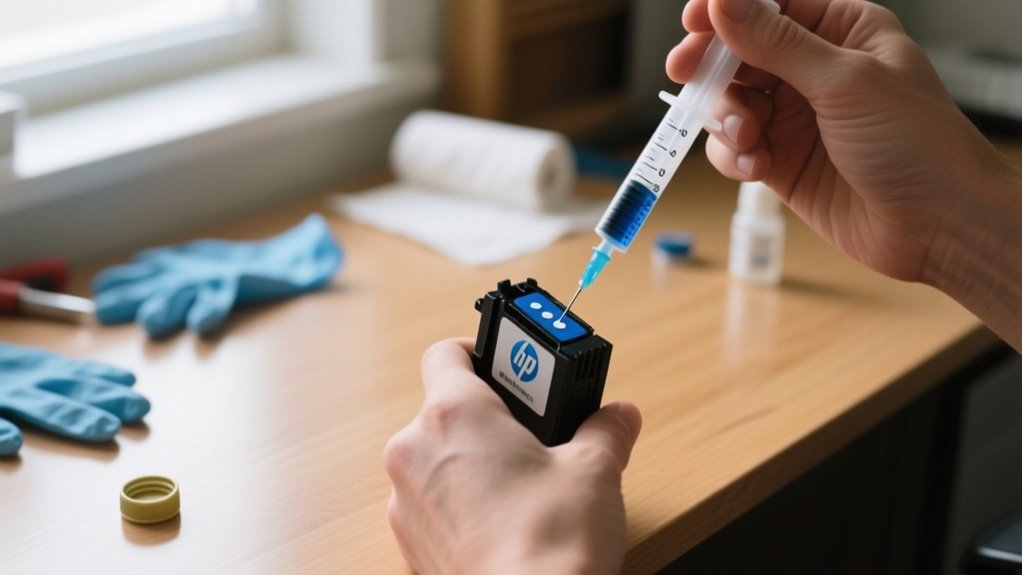
Fill Syringe and Inject Ink Into HP Cartridge
Once you’ve located the refill hole, fill your syringe with the correct amount of ink, usually about 4ml for standard cartridges or 10ml for high-yield ones. Carefully insert the needle into the hole to begin injecting.
Inject the ink slowly and steadily to avoid air bubbles, which can disrupt printing quality. As you inject, monitor the ink level in the syringe and watch the cartridge’s sponge or chamber fill up.
Inject ink slowly to prevent air bubbles and carefully watch the cartridge fill for optimal printing quality.
Stop injecting once it’s adequately filled to prevent overfilling, which could cause leaks or damage. Take your time with this step-by-step process, ensuring the syringe needle stays aligned with the fill hole to minimize any disruption to the cartridge’s components.
When finished, remove the syringe carefully to keep everything intact. At this point, you’ve successfully refilled the cartridge, and the next step will be to seal the fill hole and clean any excess ink to complete the refill process.
Seal the Refill Hole and Clean Excess Ink

After injecting the ink, you’ll need to seal the refill hole to prevent leaks and keep air out. Use a sealing plug or strong tape to securely close the refill hole on your cartridge. Make sure the seal is tight enough to prevent leaks but not so tight that it blocks ink flow or damages the cartridge.
Next, take a soft cloth or paper towel to clean any excess ink around the refill hole and cartridge surface. Removing these ink stains helps avoid smudges and keeps your workspace tidy.
After sealing, let the ink settle for at least 30 minutes to prevent leaks during printing. Over time, regularly check the refill hole’s seal for any signs of ink leakage or drying out. If you notice any issues, don’t hesitate to reseal the hole promptly.
Proper sealing and cleaning ensure your cartridge performs well and maintains consistent ink flow.
Reinstall Cartridge and Power On Printer
Before powering on your printer, carefully reinsert the refilled and sealed cartridge into its correct slot, making sure it clicks securely into place. This secure fit ensures the printer can properly recognize the cartridge during startup.
Once the cartridge is reinstalled, close the printer cover or lid to allow the printer to detect the new cartridge and prepare for operation. Next, power on the printer by pressing the power button and wait patiently for the startup process to complete.
Close the cover after reinstalling the cartridge, then power on the printer and wait for startup completion.
Keep an eye on the indicator lights or display panel to confirm the cartridge is detected and functioning correctly. Proper recognition at this stage is crucial for ideal ink flow and print quality.
After the printer powers on successfully, you’ll be ready to print a test page to verify everything works as expected. This step confirms the cartridge is properly reinstalled and the ink flow is consistent before you start your regular printing tasks.
Test Print Your Cartridge and Fix Common Problems
With the cartridge securely installed and your printer powered on, you can now verify its performance by running a test print. This step confirms proper ink flow and overall print quality after refilling. If you notice faded or uneven colors, run the printer’s cleaning cycle to clear any clogs affecting the print head.
To troubleshoot common cartridge problems, follow these steps:
- Inspect the test print for color accuracy and streaks indicating poor ink delivery.
- Check the cartridge and paper for ink leaks or smudges, which can signal sealing issues or overfilling.
- If inconsistencies persist, reseal or replace the refill port to restore proper ink flow.
Performing a print test regularly helps detect early issues, ensuring your cartridge maintains ideal performance and consistent print quality over time.
Frequently Asked Questions
How Many Times Can an HP Cartridge Be Refilled Safely?
You can safely refill an HP cartridge about 3 to 5 times, depending on your refilling techniques and ink quality. Pay close attention to cartridge cleaning and ink compatibility to avoid clogs.
Use reliable refill kit options and follow the refill process steps carefully. Manage refill frequency and cartridge storage to extend the cartridge’s life.
Troubleshooting refills helps maintain performance. Remember, after several refills, cost comparison might favor buying a new cartridge to avoid damage.
Does Refilling Affect Printer Warranty Coverage?
Refilling usually won’t affect your printer warranty if you follow the right refill process using compatible ink and proper refilling tools. Avoid ink leakage by ensuring cartridge sealing and allowing adequate ink drying time.
Using quality refill kits and mastering refill techniques helps prevent damage. However, frequent refilling or poor refilling can cause issues, which might void coverage if they lead to printer damage.
Keep refilling costs low but prioritize care to protect your warranty.
What Type of Ink Is Best for HP Cartridges?
Wondering what ink type works best for your HP cartridges? You want inks with proven ink compatibility that maintain color accuracy and minimize ink drying time.
Pigment-based inks are ideal. They extend cartridge lifespan and reduce refill frequency. Choosing high-quality refill kits ensures smooth refill procedures and proper ink storage, preventing clogs and leaks.
Paying attention to the ink drying process also helps you avoid smudging and keeps prints crisp every time.
Can Refilled Cartridges Cause Printer Damage?
Yes, refilled cartridges can cause printer damage if you’re not careful. Cartridge leakage from overfilling or poor seals can harm print heads and lower print quality.
Using incompatible ink or cheap refilling tools risks clogging and shortens cartridge lifespan. Frequent refilling also increases ink drying issues inside the cartridge.
To save on ink costs safely, always use a reliable refill kit and make sure your ink is compatible to protect your printer.
How to Dispose of Used Ink Cartridges Responsibly?
You might think tossing used cartridges in the trash is easier, but responsible disposal methods are key to reducing environmental impact. Participate in ink cartridge recycling and cartridge recycling programs offered by HP or local centers to guarantee eco friendly waste handling.
These waste management strategies support sustainable printing practices and hazardous waste handling. Following cartridge disposal tips helps you practice eco conscious printing, conserving resources and minimizing pollution.
Conclusion
Refilling your HP ink cartridge is like tending a small garden. Each step carefully nurtures your printer’s life. By gathering tools, injecting fresh ink, and sealing the refill hole, you’re watering a seed that will soon bloom with vibrant prints.
Just as a gardener tests soil and adjusts care, you’ll test your cartridge and troubleshoot. With patience and care, your printer will flourish again, saving you money and reducing waste with every colorful page.
Leave a Reply